How to Speed Up Microsoft Windows Vista

My computer is running slower and slower than before. It takes me nearly one minute to open my power point. When I click to perform a task on my computer, I simply don’t want to wait for my computer to perform that task like a snail, I want it to be instantaneous. Thus I decided to find a few methods to help speed up my Windows Vista Operating system. Here are the 3 best and simplest ways to speed up Windows Vista.

Method A:


Declutter Your Hard Drive


If your computer is a new one, you will find that it is loaded down with programs that you don’t want or need. For this reason, it is recommended to open your control panel, select Programs, then select Remove programs. Here you can delete all of the programs that you never wanted in the first place.

Once you have cleaned all of your unnecessary software, you will need to delete all the fragments of files that are left behind. Often, your control panel will not delete all of the .dll files and .exe files in all the programs. Also, you should clean the junk files in your registry.

Yet, it will take some time for your computer to find the files it’s looking for. This is one of the important reasons your computer slows down.


Method B:


Defragment Your Hard Drive

Fragmentation is the process when the computer writes data to a disk without keeping everything together in one spot. The hard drive is like a bedroom and the files are like your clothes. The clothes are scattered here and there instead of being put in the wardrobe in good order. The data of one program are not saved together, which means it takes longer for the disk to find it. Bringing all the components required to perform the task that you need is one of the causes for your computer to slow down.


Method C:


For this reason, I strongly recommend a program called SmartPCFixer.

Smartpcfixer is a top-ranking error-resolution registry cleaner which will fix the computer errors and optimize the system settings. You can scan, clean, optimize, and keep your PC much healthier with it!


You can download Smartpcfixer here.

http://www.smartpcfixer.com/

Just run Smartpcfixer, click ‘quick scan’

After the scan is completed, click ‘repair all’ button.


http://www.lionsea.com/

How to Fix IE Problems


Internet Explorer (formerly Microsoft Internet Explorer and Windows Internet Explorer, commonly abbreviated IE) is a series of graphical web browsers developed by Microsoft and included as part of the Microsoft Windows line of operating systems.


Its usage share attained a peak of about 95% in a certain period of time. Later its usage share declined a little but it is still the main choice for people. But most people are familiar with it and do not like to change it. Just like me, I am the loyal user.


But IE may do not work someday or it becomes very slowly or there is some errors that bother you for a long time. It may freeze occasionally and do not work carefully. The first thing you should is to fix these problems and make your IE work again. I think it is difficulty for you to troubleshoot what’s wrong with it and it is your best choice to choose professional software to fix these IE problems for you.


I strongly recommend Smarpcfixer.


SmartPCFixer is an excellent Windows registry cleaner; a system that runs at optimal state. Powerful and effective scanning technology is utilized to help the user quickly identify errors and invalid entries that cause computer slow, freezing or crashing. A set of tools are available for you to restore and maintain a smooth running system and to provide security and safety. It is strongly recommended that you should use our SmartPCFixer built-in backup utilities to backup the registry.

Instantly Fix Your Computer Errors by automatically diagnosing and fixing various system errors with intelligent Smarpcfixer error knowledge base.

Dramatically Speed Up Your Computer and Internet by fixing all issues slowing down your computer and internet and fine-tuning your system setting to maximum performance.

Protect Your Internet Security and Privacy by tuning-up your computer security strategy to close backdoor that can be hijacked by virus, Trojan, and spyware.

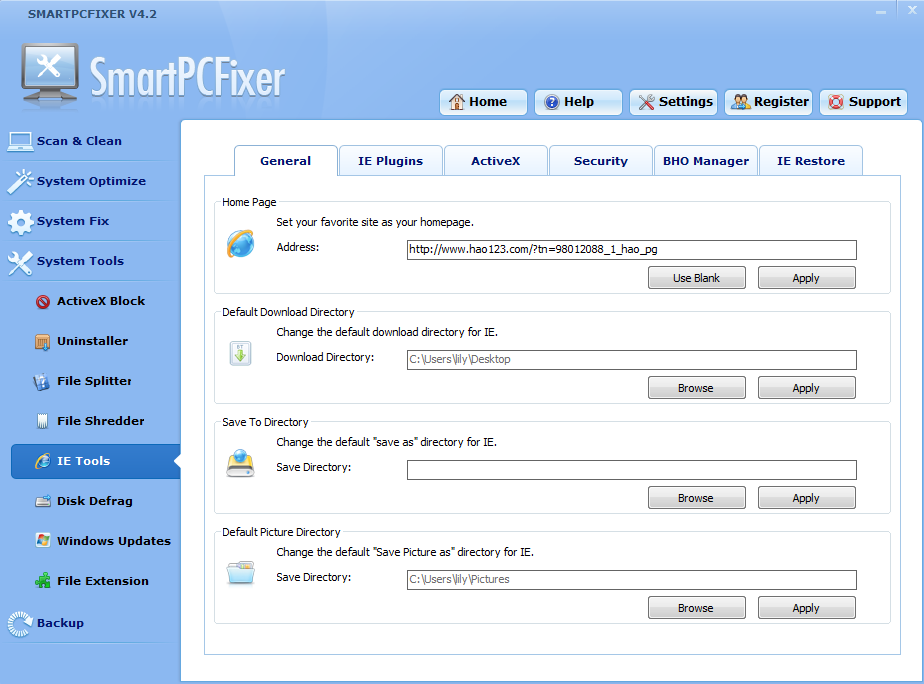
How to Fix IE Problems?


Step 1: Download and Install Smartpcfixer.

Step 2: Click System Tools and IE Tools.

Step 3: Choose the function which can fix your problem.


How to Fix Error 1721


When people are using computer, they often need to remove some unnecessary software. Some people will use software to uninstall it, some people will remove the software manually. But when they use the “Add or Remove Programs” feature in the Windows Operating System, they will always receive error 1721. What does it mean? What causes this error? Many people have such kind of question in their mind. In this article, we will give you a detail introduction. What’s more, we will offer you several method to fix it.


Causes of Error 1721:


On the one hand, this error indicates that there is a problem with this Windows Installer package. And a program required for the install to complete could not be run properly. On the other hand, misconfigured system files or corrupted registry entried can also cause error 1721.


How to Fix Error 1721


If you want to fix it effectively and efficiently, you can use automatically software.

Smartpcfixer can be the best choice for you. SmartPCFixer™ is a top-ranking error-resolution registry cleaner which will fix the computer errors and optimize the system settings. You can scan, clean, optimize, and keep your PC much healthier with it!

How to Fix it with Smartpcfixer?


STEP 1 Download Smartpcfixer & Install it. (Note: If the download link doesn’t work you may need to download it from a Download Mirror).

STEP 2 Scan Your PC for Errors.

STEP 3 Click the “Fix All” Button to Repair Your PC.

Of course, if you are a technical guy of computer, you can do the following step to troubleshoot this error.


Re-register Windows Installer Service


 1.Restart your computer and log in Safe Mode. You just need to Press F8 when you see the BIOS information on you screen.

2. Log on as “local administrator.” Click “Start” and select “Run.” Type “cmd.exe” in the “Run” box and click “OK.” This will open the DOS (command) prompt.

3. Un-register Windows Installer service by typing “msiexec/unregister” at the command prompt and hit “Enter.” Immediately re-register Windows Installer by typing “msiexec/regserver” on the next command line and hit “Enter.” Type “Exit” to close out of the command prompt. You can now attempt to remove the program once again from “Add or Remove Programs.”

How to Remove Error 1603


What is Error 1603?

Error 1603 is a common installation error which often occurs when you want to install a Windows Installer package on your OS. You will see the error message “A fatal error occurred during installation”


Causes of Error 1603:

  1. No enough space for installing software
  2. The temporary directory is not clean
  3. Don’t have administrative privileges
  4. The Windows Installer Service is not properly installed on your computer


How to Fix Error 1603?

Solution OneInstall Smartpcfixer to help you remove error 1603.

SmartPCFixer™ will help identify and fix Windows’ invalid registry entries. By running Scan & Cleaner as part of scheduled maintenance, it will keep your PC from freezing or frequent crashes . Using it will reduce the probability of you getting a “blue screen”, program not responding or lock up.

How to use Smartpcfixer

STEP 1 Download Smartpcfixer & Install it. (Note: If the download link doesn’t work you may need to download it from a Download Mirror).

STEP 2 Scan Your PC for Errors.

STEP 3 Click the “Fix All” Button to Repair Your PC.


Solution Two: Fix it by the following step.

1.Double-click “My Computer” on your desktop.

2.Right-click the drive where you wish to install the package. It is typically your “C:\” drive. Choose “Properties.”

3.Click the “Security” tab.

4.Click the “Add” button.

5.Click “SYSTEM” under “Name.” Click “Add” and “OK.”

6.Check “Allow” next to “Full Control” under the subheading “Permissions.”

7.Click “Advanced.”

8.Check “Replace permission entries on all child objects with entries shown here that apply to child objects” if you use Windows XP. Click “OK.” Check “Reset permissions on all child objects and enable propagation of inheritable permissions” if you use other versions of Windows. Click “OK.”

9.Click “Yes” when prompted.

10.Double-click the installer package that was previously generating the error. You will no longer have any issues with it.

How to Fix Error 1723?


What is Error 1723?

Error 1723 is a Dll error which is mainly caused by corrupted Dll fles from improper Java installations. We should not ignore the importance of error 1723. This error is associated with Java. However, Java is a technology that supports many website and computer games. If you don’t fix it, it will take bad effect on your software and your dll files will be corrupted.

Many people wonder if this problem can be fixed, the answer is definitely yes.

How to Fix Error 1723?

Smartpcfixer is a good tool to solve the dll problem. SmartPCFixer™ will help identify and fix Windows’ invalid registry entries. By running Scan & Cleaner as part of scheduled maintenance, it will keep your PC from freezing or frequent crashes. Using it will reduce the probability of you getting a “blue screen”, program not responding or lock up.

Use Smartpcfixer to Fix Error 1723:

STEP 1 Download Smartpcfixer & Install it. (Note: If the download link doesn’t work you may need to download it from a Download Mirror).

STEP 2 Scan Your PC for Errors.

STEP 3 Click the “Fix All” Button to Repair Your PC.

Fix Error 1723 manually:

1.Press the Windows key.

2.Click “Control Panel” and then “Uninstall a Program.”

3.Select the Java application under the list of installed programs and select “Uninstall.” Click “Next” at the onscreen prompts to complete the removal process. Reboot your computer.

How to Fix Hostdll Error

Sometimes you are unable to access Internet Explorer (Windows Explorer and My Computer are also inaccessible). Whenever you try to access any of the above programs, I get the following error message:


IEXPLORE caused an invalid page fault in
module HOST.DLL at 0187:00efd5fd.


And a lot of registry files that you even don’t understand.


But do you know what hostdll is?


It generally exists in your system folder or your system 32 folder. The locations will show c:\windows\system\host.dll.


It is often related to spyware and adware. When your computer always pop up some ad you may think if there is something wrong with hostdll.


Because hostdll occupies most of CPU usage and lead to the Operate System can not shut down all the www. Service. So you should deal with this kind of problem urgently.

Now there are a great amount of free download dll web sites. But technicians recommend Do Not Download dll directly on those website. When you download dll, it may bring some virus or spywares at the same time. That is a big trouble.


But if you fix this problem via Smartpcfixer, you will avoid these troubles.


Smartpcfixer uses a high-performance detection algorithm that will quickly identify missing and invalid references in your Windows registry. With a few easy steps Smartpcfixer will scan your entire Windows registry for any invalid or obsolete entries and provide a list of the registry errors found. After that you can choose to clean list items with selection or automatically repair them all.

 
For your convenience and protection, Smartpcfixer also provides a backup mechanism for any repaired files so that you can easily recover any changes if required.


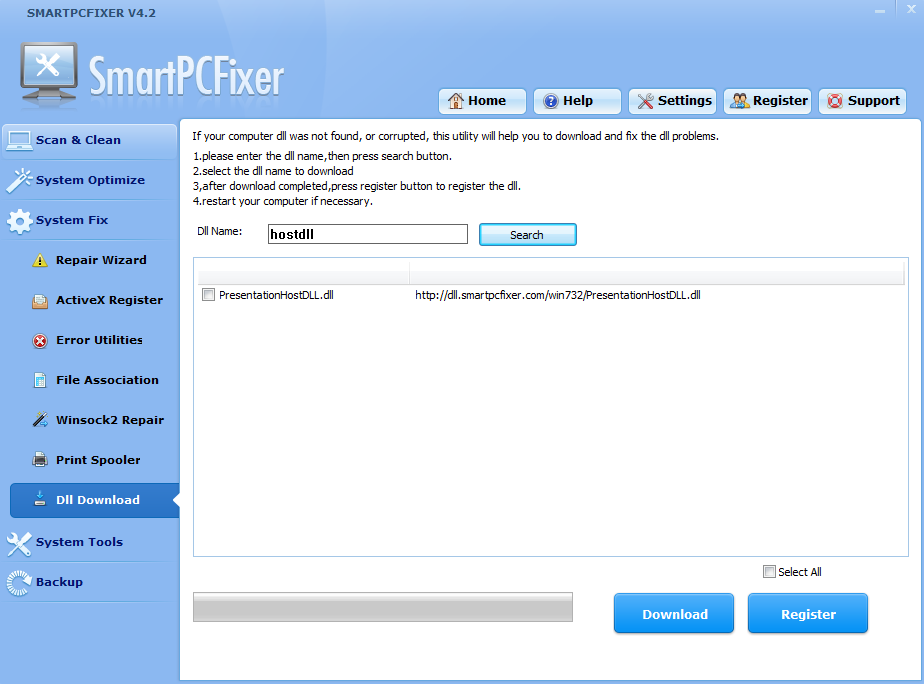
Just 3 steps:

Step 1: Download and Install Smartpcfixer.

Step 2: Click System Fix and then Dll Download.

Step 3: Type hostdll in the blank and click Download.


How to Delete Temporary Internet Files in IE

The temporary Internet files in Internet Explorer 9, sometimes we call it cache, are the copies of text, images, and other data from the websites you visited nearly that are saved on your hard disk. The cache is a component that transparently stores data so that future requests for that data can be served faster. The data which is stored in a cache might be values that have been computed earlier or duplicates of original values that are stored in other place. As for troubleshooting a problem goes, deleting temporary Internet files is helpful when a web page won’t load. Deleting the temporary Internet files in Internet Explorer is safe and useful. Bur it won’t remove other things like cookies, passwords, etc. Follow the steps below to clear the cache in Internet Explorer 9:

Method A:


  • Open Internet Explorer 9.
  • On the very right-hand side of the browser, click on the gear icon, also called the Tools icon, followed by Safety, and finally delete browsing history.
  • If you have the Menu bar enabled, you can instead click Tools and then delete browsing history.
  • In the Delete Browsing History window that appears, uncheck all options except the one labeled Temporary Internet Files.
  • Click the Delete button.
  • The Delete Browsing History window will disappear and you may notice your mouse icon go busy for a few moments.
  • As soon as your cursor returns to normal, consider your temporary Internet files deleted.


Method B:


  • You can run Smartpcfixer to fix it automatically.
  • Smartpcfixer is a top-ranking error-resolution registry cleaner which will fix the computer errors and optimize the system settings. You can scan, clean, optimize, and keep your PC much healthier with it!
  • You can download Smartpcfixer here.
  • http://www.smartpcfixer.com/
  • Just run Smartpcfixer, click ‘quick scan’
  • After the scan is completed, click ‘repair all’ button.


http://www.lionsea.com/


How to Fix Windows Not Responding Problems

We need computers to work, to communicate with friends or to watch movies. Running your computer on the popular windows operating system can be very enjoyable when the system is working smoothly. However, you may wake up one morning and find your computer cannot start normally. Your windows may fail to come up as usual. If you encounter such a problem, there’s no need to panic. You can always get it fixed by following these tips below:


Discover the remote cause of the problem

Usually, windows may stop to respond as a result of software or hardware confliction. It can also be a result of new program installation or any other software-related problem. An anti-virus program can also cause this error. This happens when the program messes up your registry data. It can also occur when you have two different anti-virus programs running on your computer. They may freeze your windows and cause it not to turn up. Here are some tips for you.

Method A:


Repair Windows

Commonly, windows may fail to respond when some of its system files have been damaged. To get this fixed, you have to restore the windows installation. All you need is to restart your system and slot in the Windows installation CD. You have to reboot your system from the CD-Rom in order to get it reinstalled. You’ll then go ahead to follow the onscreen instruction to get the operating system restored. During the repair process, the old windows files will be cleaned out while fresh ones are stored and re-installed.


Method B:


You can run Smartpcfixer to fix it automatically.

Smartpcfixer is a top-ranking error-resolution registry cleaner which will fix the computer errors and optimize the system settings. You can scan, clean, optimize, and keep your PC much healthier with it!


  • You can download Smartpcfixer here.
  • http://www.smartpcfixer.com/
  • Just run Smartpcfixer, click ‘quick scan’
  • After the scan is completed, click ‘repair all’ button.


http://www.lionsea.com/


How to Fix Wmi Errors in Vista

WMI is an important utility which was added for IT administrators to find and fix errors in the Windows operating system. WMI was first introduced in Windows 2000. If there is anything wrong with your computer, then you can rename the folder the WMI contents are in, and let Windows repair the corrupted data. This job will require use of the command prompt and may be a little difficult for a novice. Don’t worry. Just read on, and you will have your WMI back up and running in a few minutes.

Method A:


Hit the “Start” button and launch a command prompt with elevated privileges. In the search box Type in “Command Prompt”. When it appears right click the program and click on “Run as Administrator”.

After the prompt opened, type in “net stop winmgmt”. This will stop the WMI so we can fix it.

Navigate to “C:\Windows\System32\wbem” and right click on the folder “Repository” and rename it to something like, “Repository_bad.”

Go back to the command prompt you used earlier and type in the command, “net start winmgmt”.

Re-register the WMI by typing the following command into the command prompt, “winmgmt /salvagerepository.” This command will make Vista be able to assess the WMI folder when it can’t find it, (due to your renaming it earlier) and it will automatically fix all the errors caused by the previous WMI files by creating new WMI components.


Method B:


You can run Smartpcfixer to fix it automatically.

Smartpcfixer is a top-ranking error-resolution registry cleaner which will fix the computer errors and optimize the system settings. You can scan, clean, optimize, and keep your PC much healthier with it!


You can download Smartpcfixer here.

http://www.smartpcfixer.com/

Just run Smartpcfixer, click ‘quick scan’

After the scan is completed, click ‘repair all’ button.


http://www.lionsea.com/


How to Fix Appcrash Errors on a Computer

When program files or files within your computer’s registry have become corrupted, the programs might crash unexpectedly. When a program crashes, you may get an Appcrash error. The error message will say “Windows Media Player (or whichever program has crashed) has stopped working” and then list some technical information regarding the cause of the crash. Unless you are a computer programmer or a geek, you may never completely understand what has caused your program crash, but it doesn’t mean you can’t fix it.

Method A:


Delete any new programs that you have downloaded recently. Often, the corruption is due to a bad download that installs harmful files. If you started to get the Appcrash error on your system after downloading a new program or file from the Internet, it’s highly likely that you have downloaded a bad product or a virus. Go to Control Panel to get rid of the program immediately.

Uninstall the program which is crashing. It is hard to fix the program’s corrupted files while the program is still installed. To make sure that you’ve deleted the program files completely, it is safest to completely uninstall it from the system.

Run a full scan for your computer. Your computer should already have an antivirus program installed that can scan for virus and delete them from your system. If you do not have antivirus software in your computer, that could be very dangerous. Purchase and install antivirus software as soon as possible. Once you have the antivirus program installed, open it and click “Scan Computer.” The antivirus scan will isolate malware and you will be given the option to remove them from your system.

Reinstall the program that was crashing. Now that the corrupted files have all been removed, your program will run smoothly after reinstallation.


Method B:


You can run Smartpcfixer to fix it automatically.

Smartpcfixer is a top-ranking error-resolution registry cleaner which will fix the computer errors and optimize the system settings. You can scan, clean, optimize, and keep your PC much healthier with it!


You can download Smartpcfixer here.

http://www.smartpcfixer.com/

Just run Smartpcfixer, click ‘quick scan’

After the scan is completed, click ‘repair all’ button.


http://www.lionsea.com/