How to Fix Wmi Errors in Vista

WMI is an important utility which was added for IT administrators to find and fix errors in the Windows operating system. WMI was first introduced in Windows 2000. If there is anything wrong with your computer, then you can rename the folder the WMI contents are in, and let Windows repair the corrupted data. This job will require use of the command prompt and may be a little difficult for a novice. Don’t worry. Just read on, and you will have your WMI back up and running in a few minutes.

Method A:


Hit the “Start” button and launch a command prompt with elevated privileges. In the search box Type in “Command Prompt”. When it appears right click the program and click on “Run as Administrator”.

After the prompt opened, type in “net stop winmgmt”. This will stop the WMI so we can fix it.

Navigate to “C:\Windows\System32\wbem” and right click on the folder “Repository” and rename it to something like, “Repository_bad.”

Go back to the command prompt you used earlier and type in the command, “net start winmgmt”.

Re-register the WMI by typing the following command into the command prompt, “winmgmt /salvagerepository.” This command will make Vista be able to assess the WMI folder when it can’t find it, (due to your renaming it earlier) and it will automatically fix all the errors caused by the previous WMI files by creating new WMI components.


Method B:


You can run Smartpcfixer to fix it automatically.

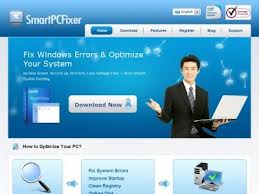
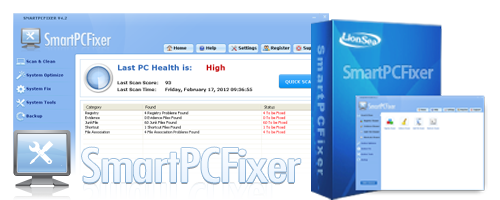
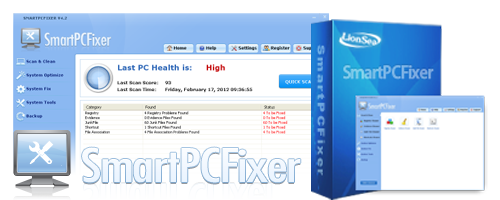
Smartpcfixer is a top-ranking error-resolution registry cleaner which will fix the computer errors and optimize the system settings. You can scan, clean, optimize, and keep your PC much healthier with it!


You can download Smartpcfixer here.

http://www.smartpcfixer.com/

Just run Smartpcfixer, click ‘quick scan’

After the scan is completed, click ‘repair all’ button.


http://www.lionsea.com/


How to Fix Appcrash Errors on a Computer

When program files or files within your computer’s registry have become corrupted, the programs might crash unexpectedly. When a program crashes, you may get an Appcrash error. The error message will say “Windows Media Player (or whichever program has crashed) has stopped working” and then list some technical information regarding the cause of the crash. Unless you are a computer programmer or a geek, you may never completely understand what has caused your program crash, but it doesn’t mean you can’t fix it.

Method A:


Delete any new programs that you have downloaded recently. Often, the corruption is due to a bad download that installs harmful files. If you started to get the Appcrash error on your system after downloading a new program or file from the Internet, it’s highly likely that you have downloaded a bad product or a virus. Go to Control Panel to get rid of the program immediately.

Uninstall the program which is crashing. It is hard to fix the program’s corrupted files while the program is still installed. To make sure that you’ve deleted the program files completely, it is safest to completely uninstall it from the system.

Run a full scan for your computer. Your computer should already have an antivirus program installed that can scan for virus and delete them from your system. If you do not have antivirus software in your computer, that could be very dangerous. Purchase and install antivirus software as soon as possible. Once you have the antivirus program installed, open it and click “Scan Computer.” The antivirus scan will isolate malware and you will be given the option to remove them from your system.

Reinstall the program that was crashing. Now that the corrupted files have all been removed, your program will run smoothly after reinstallation.


Method B:


You can run Smartpcfixer to fix it automatically.

Smartpcfixer is a top-ranking error-resolution registry cleaner which will fix the computer errors and optimize the system settings. You can scan, clean, optimize, and keep your PC much healthier with it!


You can download Smartpcfixer here.

http://www.smartpcfixer.com/

Just run Smartpcfixer, click ‘quick scan’

After the scan is completed, click ‘repair all’ button.


http://www.lionsea.com/

How to Fix a JSP Syntax Error

JavaScript is a scripting language that was developed by Netscape, and is widely used in hundreds of web pages and applications all over the world. Just like other programming languages, JavaScript requires the use of very specific syntax or structured text to ensure that commands execute properly when performing a programmed task. A single typo, or omission of a symbol or command can destroy the whole program, and cause other errors in the application. In most cases, to fix a syntax error in JavaScript or Java Server Pages is as simple as correcting typos. Before you can fix the syntax error, you must isolate and locate the line of code which has caused the problem.

Method A:


Open SDK console application on your computer. Click “File” and “Open” and open the Web application you want to repair.

Click “File” and “Compile” on the menu bar or the “Compile” button on the tool bar. Wait for the application to compile the code in your application.

Go to the Web page editor application. Create a new Web page in the application. Insert code to link to the JavaScript or JSP application. Save the Web page to a folder on your computer.

Browse to the folder where you saved the script or compiled JSP application. Copy the file to the same folder that contains the Web page you created earlier.

Open the Web page in a major Web browser. Wait for the browser to attempt to load the page and then display an error message. Record the line number the Web browser reports as containing a syntax error.

Open the Web page in other major Web browser applications. Find the line of number which contains the same code as all messages reported by the browser programs. Test the page in Internet Explorer, Firefox and Chrome to ensure the script or application is compatible with major browsing platforms.

Open the SDK console application. Open the source file for the script or application. Scroll to the line number reported in the browser error message. Retype command text or variables to repair the syntax error. Recompile the application or script and test again in all four major browsers.


Method B:


You can run Smartpcfixer to fix it automatically.

Smartpcfixer is a top-ranking error-resolution registry cleaner which will fix the computer errors and optimize the system settings. You can scan, clean, optimize, and keep your PC much healthier with it!


You can download Smartpcfixer here.

http://www.smartpcfixer.com/

Just run Smartpcfixer, click ‘quick scan’

After the scan is completed, click ‘repair all’ button.

How to Fix YouTube Loading Errors

YouTube is the most popular video sharing website which allows individuals on the site to upload home made movies directly to the service. Once uploaded, other individuals using YouTube are able to view the videos whenever. However, if you are attempting to watch a movie and receiving an error message, several options are available to correct the error.

Method A:


Update the browser. Download the latest version of your Internet browser. The latest release of the browser may contain updates that correct the video problems you are encountering.

Go to the Flash download site and select the download option. Make sure that it is the latest version of Flash available. Once downloaded, double-click the file and follow the prompts to install the Flash software onto the computer.

Restart the web browser. Occasionally, programs loads incorrectly and causes problems. Restarting the web browser is going to correct many of the accidental errors you are encountering with the video files.

Close out other Internet programs while attempting to view the video file. Using multiple programs at the same time can reduce the amount of bandwidth used for the videos, potentially causing the web browser to crash.


Method B:


You can run Smartpcfixer to fix it automatically.

Smartpcfixer is a top-ranking error-resolution registry cleaner which will fix the computer errors and optimize the system settings. You can scan, clean, optimize, and keep your PC much healthier with it!


You can download Smartpcfixer here.

http://www.smartpcfixer.com/

Just run Smartpcfixer, click ‘quick scan’

After the scan is completed, click ‘repair all’ button.


http://www.lionsea.com/

How to Fix Socket Error 11004

The most common cause of a Socket Error 11004 is a miscommunication. This error indicates that the host trying to be reached does exist, but it can’t be reached for some reason. This can be due to wrong placed data, a bad space character at the end of server name, or it may be a corrupt registry on the PC itself. Socket Error 11004 on your Windows computer is caused by a corrupt file on your Internet settings. This error will stop you from sending or receiving emails. You can use the Windows file checker that came installed on your computer. This software will replace the corrupt file with the correct version.


Method A:


  • Click the “Start” menu and then go to the “All Programs” button.
  • Click the “Accessories” button and then right-click on “Command Prompt.”
  • Click the “Run as administrator” option and enter your administrator password into the field that appears.
  • Type “sfc /scannow” (without the quotation marks) into the Command prompt and press your “Enter” key.
  • Wait for the computer to fix your socket error. A progress bar will be displayed on your computer screen to tell you how far along the process is. Restart the computer after the repair has finished.


Method B:


You can run Smartpcfixer to fix it automatically.

Smartpcfixer is a top-ranking error-resolution registry cleaner which will fix the computer errors and optimize the system settings. You can scan, clean, optimize, and keep your PC much healthier with it!


  • You can download Smartpcfixer here.
  • http://www.smartpcfixer.com/
  • Just run Smartpcfixer, click ‘quick scan’
  • After the scan is completed, click ‘repair all’ button.


http://www.lionsea.com/


How to Fix Microsoft Error Code Stop: c0000135 User32

Dynamic-link library or DLL, is Microsoft’s implementation of the shared library concept in the Microsoft Windows and OS/2 operating systems. These libraries usually have the file extension DLL, OCX (for libraries including ActiveX controls), or DRV.

DLLs provide a mechanism for shared code and data, allowing a developer of shared code/data to upgrade functionality without requiring applications to be re-linked or re-compiled. From the application development point of view Windows and OS/2 can be thought of as a collection of DLLs that are upgraded, allowing applications for one version of the OS to work in a later one, provided that the OS vendor has ensured that the interfaces and functionality are compatible. The Microsoft Windows XP recovery console allows you to fix the error Stop:c0000135 User32. This error occurs because of the corrupt user32.dll operating system file. If you can find that file and place it in the right place, you can fix this error.

Method A:


  • Insert the Windows XP setup CD in the CD drive of your computer, and then restart your computer.
  • Press “R” on your keyboard when you see the Windows XP “Welcome to Setup” screen. This will start the Windows XP recovery console. If you are asked to enter the administrator password, type it and press “Enter.”
  • Type the following commands one by one, without quotes, at the command prompt, and then press “Enter.”
  • “EXPAND drive_letter1:\i386\user32.dll_ drive_letter2\windows\system32”
  • “EXPAND drive_letter1:\i386\userinit.ex_ drive_letter2\windows\system32”
  • Replace drive_letter1 here with the CD drive letter of your computer in which the Windows XP setup CD is present (for example, E:), and drive_letter2 here with the letter of the drive in which Windows XP is installed on your computer (for example, D:).


Method B:


You can run Smartpcfixer to fix it automatically.

Smartpcfixer is a top-ranking error-resolution registry cleaner which will fix the computer errors and optimize the system settings. You can scan, clean, optimize, and keep your PC much healthier with it!


  • You can download Smartpcfixer here.
  • http://www.smartpcfixer.com/
  • Just run Smartpcfixer, click ‘quick scan’
  • After the scan is completed, click ‘repair all’ button.


http://www.lionsea.com/

How to Fix Error Code 1603

Error 1603 is an installation error that occurs when you try to install a Windows Installer package on your Windows XP or Windows 2000 operating system. You will receive the following error message: “A fatal error occurred during installation.” You may receive this error if your “SYSTEM” account doesn’t have “Full Control” permissions on the path where you wish to install the package. If the folder that you are trying to install the Windows Installer package to is encrypted, you will also receive this error message. If the drive that contains the folder that you are trying to install the Windows Installer package to is accessed as a substitute drive, you may also receive this error. You can troubleshoot this error by granting “Full Control” permissions to your “SYSTEM” account. Note that you have to log on Windows as the administrater to fic this error.

Method A:


  • Double-click “My Computer” on your desktop.
  • Right-click the drive where you wish to install the package. It is typically your “C:\” drive. Choose “Properties.”
  • Click the “Security” tab.
  • Click the “Add” button.
  • Click “SYSTEM” under “Name.” Click “Add” and “OK.”
  • Check “Allow” next to “Full Control” under the subheading “Permissions.”
  • Click “Advanced.”
  • Check “Replace permission entries on all child objects with entries shown here that apply to child objects” if you use Windows XP. Click “OK.” Check “Reset permissions on all child objects and enable propagation of inheritable permissions” if you use other versions of Windows. Click “OK.”
  • Click “Yes” when prompted.
  • Double-click the installer package that was previously generating the error. You will no longer have any issues with it.


Method B:


You can run Smartpcfixer to fix it automatically.

Smartpcfixer is a top-ranking error-resolution registry cleaner which will fix the computer errors and optimize the system settings. You can scan, clean, optimize, and keep your PC much healthier with it!


  • You can download Smartpcfixer here.
  • http://www.smartpcfixer.com/
  • Just run Smartpcfixer, click ‘quick scan’
  • After the scan is completed, click ‘repair all’ button.


http://www.lionsea.com/

How to Fix Error code 18

Error code 18 is a typical error shown in Windows XP. It is caused by device drivers either not being installed or being installed incorrectly. Error code 18 is very common with a huge number of different computers, and is shown at random times whenever you use your PC. Fortunately, it’s very easy to fix this problem.

Error code 18 normally displays in these situations.

This error basically means that you have a problem with the device drivers on your PC. The drivers of your computer are used to connect hardware components of Windows with the software of your system. Essentially, a Windows computer which gives this error always has driver installation problems, driver update problems or is unable to use various hardware components on your system.

To fix this error, you need to update the drivers for your hardware. To do this, click onto “Control Panel” and then locate “Device Manager”. This will then display a large list of all the hardware on your computer, and will indicate if it has drivers installed by showing a small yellow alert next to any hardware that has driver problems. The first thing to do to fix this problem is to make sure all the drivers that your computer needs are working normally. You can try Drivertuner, it is a good driver finder which can update your drivers automatically. You can download it here:http://www.drivertuner.com/


It’s also recommended that you clean out the junk files in your “registry” of your PC as well. The registry is a big database inside the Windows system, which stores a huge number of important settings for your computer system. It keeps everything from your desktop wallpaper to your most recent websites, and all the drivers for your hardware as well. Unfortunately, many registry files can become damaged, leading your PC to display errors such as Error Code 18. To fix this, you should use a registry cleaner to clean out any potential errors on your system.

You can run Smartpcfixer to fix it automatically.

Smartpcfixer is a top-ranking error-resolution registry cleaner which will fix the computer errors and optimize the system settings. You can scan, clean, optimize, and keep your PC much healthier with it!


You can download Smartpcfixer here.

http://www.smartpcfixer.com/

Just run Smartpcfixer, click ‘quick scan’

After the scan is completed, click ‘repair all’ button.


http://www.lionsea.com/

How To Optimize Your PC with SmartPCFixer

All computers will run very slowly after using for a long time without cleaning up the rubbish and junk files. Many people think that their computer running slowly because of their computer is too old. Actually, there are many reasons that can cause a slow computer.


The main reasons that cause your PC run slowly:

  • 1. Hard drive errors.
  • 2. High level of hard drive fragmentation.
  • 3. Junk files accumulating on your PC.
  • 4. Applications consuming computer resources.
  • 5. Harmful applications (spyware and viruses).

Nowadays our PCs always get hard tasks to perform -new colorful games, heavy graphic interfaces, large photos and other files, HD movies. It all takes much of a PC’s hard drive and chipset resources. As a result a computer starts working slowly.


Answer One:

To optimize your PC, there are various Windows utilities you can use. But one of the easiest way to fix the problem – disk defragmentation.With defragmention, your PC organizes the placement of files and programs on your hard drive so that they occupy a single space. This speeds up reading and writing data on your hard drive.By following a few simple guidelines, you can maintain your computer, help increase your PC speed, and help keep it running smoothly.

Steps:

  • 1. Click “Start” button, go to “Accessories”,and click the “System Tools”.
  • 2. On the Tools window, click the “Defragment” button. You will now be prompted with another window that shows your hard drives.
  • 3. Select the drive you want to defrag and then click Analyze to make sure that the drive you selected needs defragmentation.

Note:It is important to analyze the drive first in order to determine how much time it would take to defrag the computer.


Answer Two:
Many people also recommand and use the registry cleaner software to fix this problem. It can help you speed up your computer in the fastest and easiest way.
It may:

  • a. Discover your junk files and remove them.
  • b. Find and fix the hard drive errors.
  • c. Detect viruses in your PC.


And the registry cleaner can do a very quick scanning to display a series of errors found. You just need to click the button to repair all these found problems. With the best Registry Cleaner software, I think your computer will run in the fastest speed.

How to Solve Error 643

Error Code 643 is a common error of computer problem. It often occurs in the form of “0X643” or “1603”, many people have been bothered by this error. Don’t worry, we will help you figure it out in this article.

When users are downloading updates for the .Net Framework, they often receive 643 error. The 0×643, or 643, error message occurred with updates from Microsoft .NET Framework versions 1.0, 1.1, 2.0, 3.0 or 3.5.

The causes of Error 643

According to Microsoft, the error code 0×643 is generic and is shown when an installation does not go correctly. Since you need to download .NET Framework files before you can install the updates, it’s more likely the files have become corrupted. The other listed cause for a 0×643 error is as inconsistency in the MSI database.

How to fix Error 643?

Method One: The most common Windows-based problems can be resolved using the Microsoft Fix It Wizard. You can also try using different methods of installing the .NET Framework updates, such as downloading the update directly from the Windows Update website rather than letting Windows download it in the background. Finally, Microsoft provides a .NET Framework tool that removes multiple instances of the file. Download the tool and follow the on-screen prompts to remove the program. Reboot and reinstall the updates.

Method Two:

Choose Smartpcfixer to help you solve the problem automatically. SmartPCFixer™ will help identify and fix Windows’ invalid registry entries. By running Scan & Cleaner as part of scheduled maintenance, it will keep your PC from freezing or frequent crashes. Using it will reduce the probability of you getting a “blue screen”, program not responding or lock up.

How to Fix it with Smartpcfixer?

STEP 1 Download Smartpcfixer & Install it. (Note: If the download link doesn’t work you may need to download it from a Download Mirror).

STEP 2 Scan Your PC for Errors.

STEP 3 Click the “Fix All” Button to Repair Your PC.